OOAK Table Tennis Forum
https://ooakforum.com/

Make your own blade
https://ooakforum.com/viewtopic.php?f=43&t=11969
Page 1 of 41

Author:  Ross Leidy [ 30 Mar 2010, 10:38 ]
Post subject:  Make your own blade

I'm a newcomer to this forum - in fact, this is only my second post. I won't rehash my "Introduce yourself" post, but given the topic of this post, I thought a little background would help provide some context.

I'm just getting back into the sport after playing recreationally in high school (many years ago). I don't own a table, I don't belong to a club, and I don't have a rating. (yet) But, I've been enjoying playing again over the past few months on the table at work, and I've been getting some intro coaching from a friend who competes, so it's a start. I got re-interested in the sport after I offered to try my hand at building a custom blade for that same friend. Yeah, I know - I've got no understanding of the engineering aspects of paddle design and material selection, but I'm no stranger to woodworking, and I thought it would be a fun project. Many google searches on "paddle building" later, I had uncovered a number of postings (here and elsewhere) by people who were curious about building their own blade, but I didn't run across very much in the way of instructions on how to do it. So, I started playing around with some ideas and making some paddles in my basement workshop. After a number of iterations and combination of materials, I arrived at a recipe for a decent paddle. I thought I'd share a mostly pictorial how-to for those who are interested in making a blade of their own. And, of course, this is just one way to go about it. I used the tools that I had available.

Tonight's menu:

A 5-ply blade, consisting of
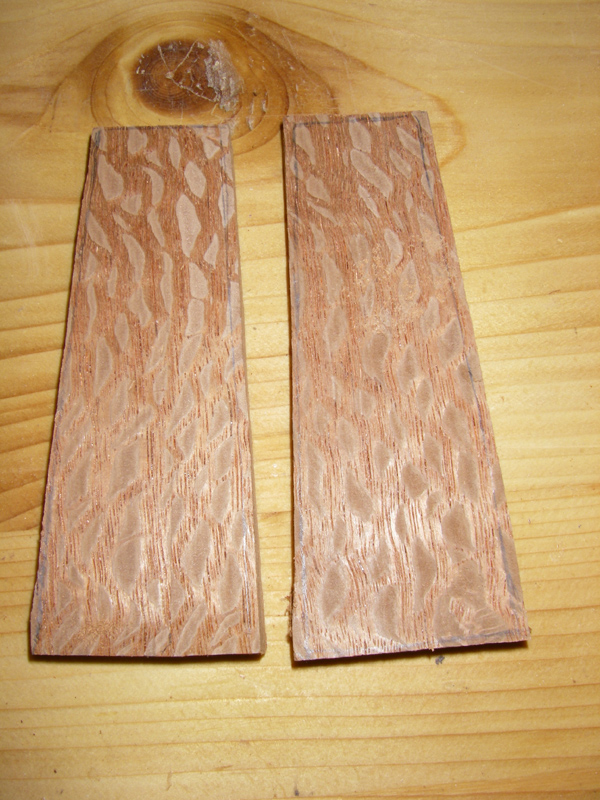
a delicate 3/16" balsa core sandwiched between 2 layers of mahogany veneer on either face
surrounded with a 1/16" ash edge veneer
served with a conic lacewood handle
finished off with a hand-rubbed poly anglaise

Start off with a 6.25" x 11.5" sheet of balsa (http://www.nationalbalsa.com) and cut the mahogany veneers for each side. The interior veneer grain is oriented transversely.

Image
Image

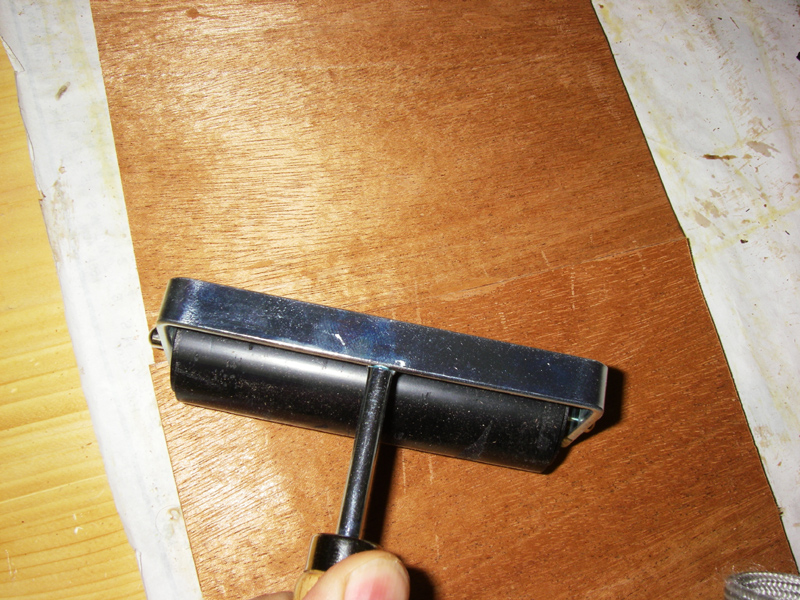
I used Titebond veneer glue, which dries noticeably harder than regular carpenter's glue.
Image

Apply the glue to the balsa substrate, then apply the veneer. I immediately coated the interior veneer with more glue and applied the outer veneer. I used a rubber roller to help set the veneers into the glue.

Image

I glued one side at a time, but if you work fast, you can get veneers glued on both sides before clamping. I have a vacuum press, which makes clamping a bit easier. Here, I wrapped the glue-up in poly sheeting to keep the glue off of the granite platens that are used to keep everything perfectly flat.

Image

These are just some partial granite tiles that I had leftover from another project.

Image

A vacuum press requires a breather layer so that the air can easily be evacuated from the bag. This is poly batting from the fabric store.

Image

The vacuum press generates about 12-13 psi clamping pressure. Over the face of the platens, that works out to be about 1200 lbs.

Image

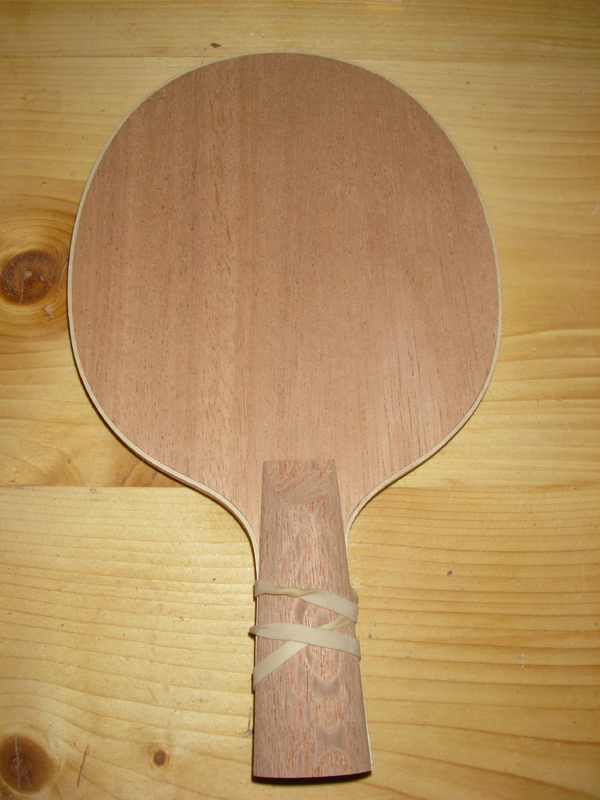
After gluing both sides, here's the finished blade blank.

Image

Next installment: the blade template.

Author:  mynamenotbob [ 30 Mar 2010, 10:51 ]
Post subject:  Re: Make your own blade

Pretty amazing photos. Thanks for posting.

Author:  Ross Leidy [ 30 Mar 2010, 11:01 ]
Post subject:  Re: Make your own blade

I started of drawing a pattern that will be used to make a template. To get a symmetric pattern, I traced a half blade shape on paper, folded down the centerline, and cut out the double layer of paper. The handle section I extend about 1/2" past where I expect to cut it off ultimately.

Image

Image

Image

Now, you could take this pattern and trace it directly on to the blade blank. But, I've been making blades of the same shape so that cut rubbers can be moved from one to another easily. A paper pattern is flimsy (and it won't work as a router template), so I transfer the outline of the pattern to some 3/4" mdf to use as a template.

Image

Image

Template rough-cut with a jigsaw and then smoothed on a sanding table.

Image

Image

Now that the template's complete, it's ready to be used to cutout the blade. I'll be doing that on a router table with a flush trim bit. I use foam double-stick tape to temporarily attach the template to the blade blank. This usually leaves a little goo on the blade, but it's easily sanded off.

Image

Image

Here's the blade trimmed on the router. The bearing on the flush trim bit rides along the template and cuts the blade to the exact same shape. I do this outside because of the noise and the flying sawdust.

Image

It takes about 1 minute (I'm guessing) to cut out the blade on the router this way.

Image

And the blade steps on the scale for the first time.

Image

Next installment: ash edge trim

Author:  Silver [ 30 Mar 2010, 11:14 ]
Post subject:  Re: Make your own blade

That's really cool,
thanks for sharing with us.

Author:  Ross Leidy [ 30 Mar 2010, 11:57 ]
Post subject:  Re: Make your own blade

The balsa is nice and light, but it's very fragile and the exposed edges can be damaged easily. Ash veneer is a perfect way to protect the balsa. It's a tough wood, and it's very flexible. On the tablesaw, I cut a slightly oversized strip of 1/16" ash veneer. It takes a length of about 28"-30" to go around the blade allowing for some excess.

Image

I wet down the strip and then started bending it around the perimeter of the blade. I clamped it in place and let the damp wood dry.

Image

After the ash veneer dried, I applied a bead of glue to the edge of the blade, and then used a load of rubber bands to hold the ash veneer in place. Without the vacuum press, I would have added more rubber bands to ensure good contact all along the perimeter of the blade.

Image

The vacuum press provides uniform pressure all along the edge.

Image

After the glue set for a couple hours, I trimmed the end of the blade to final length and glued-on an end strip of veneer.

Image


Next installment: making the handle

Author:  Ross Leidy [ 30 Mar 2010, 12:36 ]
Post subject:  Re: Make your own blade

I used some lacewood for the handle. I cut 2 pieces around 3/8" thick and 4" long. I marked the handle outline and rough cut off the excess.

Image

Image

Again, I used the foam double-stick tape to temporarily hold the two handle halves together.

Image

Using the bench sander, I sanded down the edges until they were just fractionally smaller than the blade tang.

Image

With the handle pieces shaped to the correct width, I marked some bevel lines and headed back to the sander. Rounding over the handle pieces could also be done on the router, but I was too lazy to swap out the trim bit for a roundover bit (which wouldn't quite give me the shape I wanted anyway).

Image

After beveling down to the reference lines on the bench sander.

Image

Image

After sanding down to a rough shape, I continued to smooth down the handles until they each had the same rounded contour. At that point, I separated the two halves and used the sanding spindle to create cove at the narrow end of the handle. Manufactured blades seem to consistently use a flat cut edge at the top of the handle, but I like the extra grip provided by a coved edge.

Image

Next installment: putting it all together.

Author:  Ross Leidy [ 30 Mar 2010, 13:02 ]
Post subject:  Re: Make your own blade

The final blade-sans-handle hits the scale for a weigh-in. This is after the edge veneer has been sanded down to final thickness.

Image

I applied glue to the handle halves, applied them to the blade and held it in the proper position with some rubber bands. I also popped the whole thing into the vacuum press to clamp the handle while the glue dried (not shown).

Image

Another hop on to the scale after a final sanding of the handle.

Image

And finally, a finished blade with 2 coats of hand-rubbed poly to seal it (which is a good idea with mahogany).

Image

Image

Image

There you have it. Raw materials to finished blade in a weekend. I hope that this helps someone out there who has been thinking about building one for themselves. Here's a stack of paddles that I've built using this process (the two in the foreground using the ash veneer edge).

Image

Best of luck,
Ross

Author:  kuifje [ 30 Mar 2010, 17:02 ]
Post subject:  Re: Make your own blade

Very nice. But is the edge veneer legal? In an official tournament, might a referee not want to inspect what the blade is made off? With such an edge trim it is impossible to see whether, for instance, the blade is more than 85% wood. I think there is also something in the ruling about the plies of the blade needing to be continuous.

Author:  Vinnie [ 30 Mar 2010, 17:13 ]
Post subject:  Re: Make your own blade

Simply beautiful.
How long does it take you to make one?
I have made a 1-ply blade, but nothing this great.

Would you consider making them for other people?

Author:  hongaun [ 30 Mar 2010, 17:27 ]
Post subject:  Re: Make your own blade

Very nice worksmanship! If only I'm not living so far away, I would love to use your blade and give them a try! :D

Why am I living across the ocean! :headbang:

Author:  haggisv [ 30 Mar 2010, 17:36 ]
Post subject:  Re: Make your own blade

Wow fantastic thread and great pictures Ross Leidy!

Author:  thepong [ 31 Mar 2010, 01:19 ]
Post subject:  Re: Make your own blade

Wow, those look very nice. Great woodworking skills.

Author:  hookshot [ 31 Mar 2010, 12:49 ]
Post subject:  Re: Make your own blade

I ran the edge strips just around the head so you can still see the layers.
You are the first person I know that uses a vacuum press. I do also. Very controllable pressure. Depending on the glue, less pressure can make a faster blade, thicker, hard glue layer. :)

Author:  Ross Leidy [ 31 Mar 2010, 23:31 ]
Post subject:  Re: Make your own blade

Thanks for all the kind words. Let me answer some of the questions that were asked.

kuifje wrote:
Very nice. But is the edge veneer legal? In an official tournament, might a referee not want to inspect what the blade is made off? With such an edge trim it is impossible to see whether, for instance, the blade is more than 85% wood. I think there is also something in the ruling about the plies of the blade needing to be continuous.

That was a concern of mine as well. My friend contacted someone who has umpired in European and world championships, and he said that he'd never seen a challenge to validate the 85% rule. Also, here haggisv references a blade manufacturer that uses a similar edge banding.

Vinnie wrote:
Simply beautiful.
How long does it take you to make one?
I have made a 1-ply blade, but nothing this great.

Would you consider making them for other people?

Thanks. Much of the time is spent waiting for glue to dry. The one shown above I made over last weekend, including making the template. I'd consider making some for other people, however, given my lack of experience in TT, I don't fully understand the consequences of my material selection. caveat emptor. :)

speedplay wrote:
Ross Leidy, thanks for sharing the entire process with us! Some really nice pictures and good explanations on how to do it.

Now, I would be interested to hear about how the blades play as well.

As for the ash edge, while I really do like the idea of protecting the blade this way, I have to agree with Kuifje that it might make the blades illegal for competitive play. It is no different then using edge tape really, but since it can't be removed and you did it all the way around the blade the veneers can't be seen. Not sure if it would make it more legal by only having this protective layer around the head of the blade?

Once again, thanks for sharing!

Thanks. Regarding how the blade plays, I'm woefully inadequate to describe. For my friend, he found the the (2)mahogany-1/4" balsa-(2) mahogany was too fast for the rubber he settled on. The same paddle built with 3/16" had a little more flexibility and he found that it provided the control he wanted. I'm playing a similar blade with (2)walnut-3/16" balsa-(2)walnut, with a purpleheart handle. (It's in the picture above. The purpleheart was 1/3 of the weight of the paddle! ) I'm using 729-8 on it. I'm happy with it for now - until I gain the skills to evaluate one blade against another.

Ross

Author:  Vinnie [ 01 Apr 2010, 19:54 ]
Post subject:  Re: Make your own blade

If you play at a club, maybe you could put some rubbers on it and ask experiences players to have a hit with it and see how they describe it? I certainly hope they play well, because if so, that is basically a flawless blade.

Page 1 of 41 All times are UTC + 9:30 hours
Powered by phpBB® Forum Software © phpBB Group
http://www.phpbb.com/